Rapid Upper Limb Assessment Tool (RULA)- A step by step guide
by Stephen Bowden, Chartered Ergonomist for Morgan Maxwell
This Rapid Upper Limb Assessment (RULA) Worksheet Tool guide will teach you how to use the RULA tool which can help to identify high risk postures within upper extremity tasks. The guide provides a step by step guide with free PDF download.
Background to Rapid Upper Limb Assessment (RULA)
The Rapid Upper Limb Assessment (RULA) (RULA) (McAtamney and Corlett, 1993) is an ergonomics based workplace risk assessment tool that allows you to calculate the risk of musculoskeletal loading within the upper limbs and neck. RULA is easy and quick to use and and does require expensive equipment to complete.
- RULA is designed to be a rapid tool.
- The published tool is validated and has been tested by McAtamney and Corlett and many others as reliable.
- The final score is a relative score of risk not an absolute score of risk.
- RULA is intended to be part of a broader ergonomics survey.
- RULA is a screening tool that assesses biomechanical and postural loading on the whole body with particular attention to the neck, trunk and upper limbs.
- A RULA assessment requires little time to complete and the scores generated fit into an action list which indicates the level of intervention required.
RULA’s useful scoring system allows you to take a snapshot of the highest risk posture adopted during the task. The scoring system is broken down into four actions levels with indications in as to the urgency of the investigation.
Action level 1. Score of 1-2 = Acceptable
Action level 2. Score of 3-4 = Investigate further
Action level 3. Score of 5-6 = Investigate further and change soon
Action level 4. Score of 7 = Investigate further and change immediately
RULA is designed to assess the force, posture and movement associated with sedentary tasks including manufacturing, retail, computer tasks, laboratory work or where the individual is seated or standing without moving about.
Rapid Upper Limb Assessment (RULA) Advantages & Disadvantages:
RULA advantages:
- Good for upper limb tasks.
- Measuring musculoskeletal risks.
- Evaluating outcomes such as suitability of equipment and productivity.
- Great for educating workers around high risk postures.
- Good for tasks that are mostly static.
- Showing an objective number before and after interventions (useful for making the business case when presenting to colleagues or management).
- Reasonable accurate and reliable.
- Quick and easy to use.
- Has shown to improve productivity.
- Useful for presenting info to management (gives a number; is ‘objective’)
- Can compare pre- post- intervention
- Reasonably accurate and reliable
- Can demonstrate relationship between score and regional pain.
RULA disadvantages:
- Tasks that involve the whole body.
- Wrist posture does not take into account position of function which has some wrist extension.
- Tasks that are varied.
- Does not take into account organisational and psychological factors.
- Occasional discrepancy of scores when limbs are at borders of two ranges.
- Difficult to catch with photograph. (Video is ideal)
- Limited to accessing one moment in time. Have to choose most extreme posture.
- May require several RULA assessments for one task.
- Not so good for tasks that involve the whole body and/or are varied.
A step by step guide to using Rapid Upper Limb Assessment (RULA)
Select postures for assessment using interview and observation techniques.
The assessor should, first of all, look to combine interview and observation techniques to build a rich picture of the task being assessed. Observe several cycles (ideally while filming) of the task while asking the person completing the task to speak aloud any concerns they have. The assessor should ensure that the full cycle of the task is observed before selecting final postures for scoring.
From the data collected during interview and observation, the assessor can then select which postures to assess using the RULA tool. You should look to assess postures that are:
- Held for the longest period of time.
- Appears to be highest risk posture adopted.
- Posture associated with highest load.
The assessor should then look to focus on whether the right, left or both arms needs to assessed.
At this point, the assessor can move onto the RULA score sheet.
Complete the Rapid Upper Limb Assessment (RULA) Score Sheet.
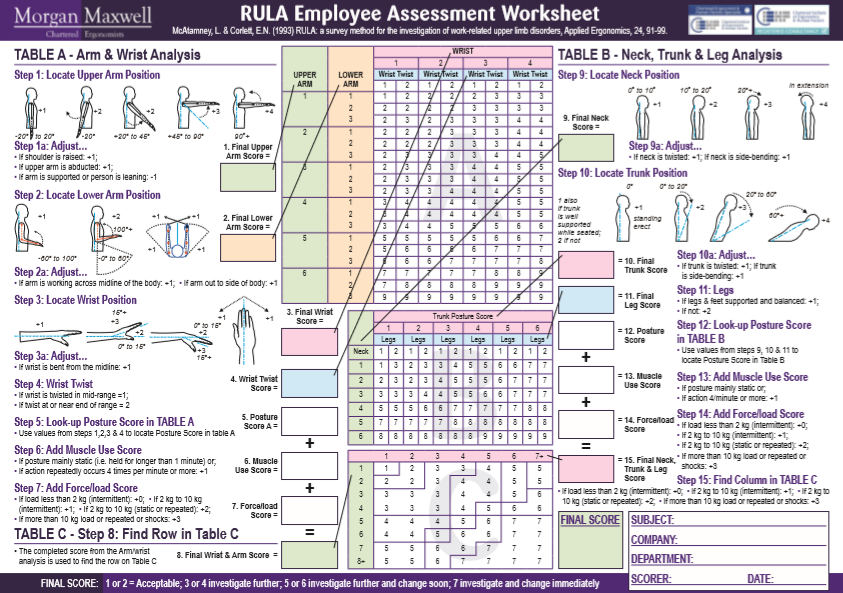
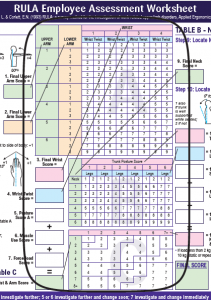
Morgan Maxwells RULA worksheet is divided into two main body segments, Table A (Arms and Wrists) & Table B (Neck, Trunk and Leg Analysis) with Table C showing the Final RULA score.
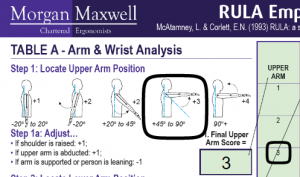
Step 1: Locate Upper Arm Position
The focus of Step 1 is to locate the upper arm posture. The upper arm consists of the shoulder to the elbow.
The following options as seen in the image below are provided:
-20 to +20 degrees +1
20 + degrees of extension or more + 2
45 to 90 degrees of shoulder flexion + 3
90 degrees + of shoulder flexion + 4
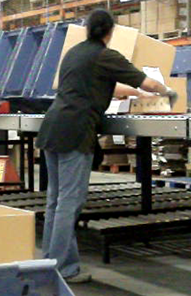
In the example below the operator was observed to adopt 45 to 90 degrees of shoulder flexion which gave a score of +3
Step 1a: Adjust…
If shoulder is raised + 1
If upper arm is abducted + 1
If arm is supported or person leaning -1
In the example below the lady was not observed adopting any of the above postures in 1a.
Final Upper Arm Score = 3
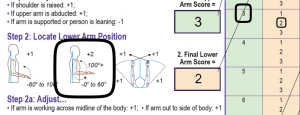
Step 2: Locate Lower Arm Position
The focus of Step 2 is to locate the lower arm posture. The lower arm consists of the elbow to wrist.
The following options as seen in the image below are provided:
60 to 100 degrees = +1
0 to 60 degrees = + 2
100 degrees plus = + 2
In the example below the lady was observed to adopt 0 to 60 degrees of elbow flexion which gave a score of +2
Step 2a: Adjust…
If arm is working across mid-line of the body + 1
If arm out to side of body + 1
In the example below the lady was not observed adopting any of the above postures in 2a.
Final Lower Arm Score = 2
Step 3: Locate Wrist Position
The focus of Step 2 is to locate the wrist position.
The following options as seen in the image below are provided:
Wrist neutral posture + 1
0-15 degrees of extension + 2
15 degrees plus of extension + 3
0-15 degrees of flexion + 2
15 degrees plus of flexion + 3
In the example below the lady was observed to adopt a neutral wrist posture which gave a score of +1. (Be aware that some extension of the wrists is required to adopt the position of function. The position of function is where the hand and wrist are at rest).
Step 3a: Adjust…
If wrist is bent from mid-line (Ulna or radial deviation) + 1
In the example below the lady was not observed adopting any ulna or radial deviation
Final Wrist Score = 1
Step 4: Wrist Twist
The focus of step 4 is to establish if wrist twist (pronation / supernation).
The risk of injury increases when joints work close to or at full range of movement.
If wrist is twisted in mid range + 1
If wrist is near to or at end of range + 2
In the example below the lady was not observed adopting close to end of range pronation which equates to a + 2

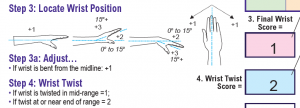
Wrist Twist Score = 2
Step 5: Look up Posture Score in TABLE A
Use values from steps 1,2,3 & 4 to locate score in TABLE A
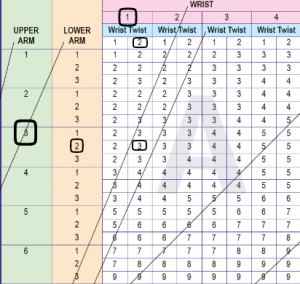
TABLE A Score = 3
Step 6: Add Muscle Use Score
- If posture mainly static (i.e. held for longer than 1 minute) or
- If action repeatedly occurs 4 times per minute or more + 1
During the interview and observation process it was established that a similar action occurs more than 4 times per minute.

Muscle Use Score = 1
Step 7: Add Force/Load Score
If load less than 2kg (intermittent): + 0; If 2kg to 10kg (intermittent) + 1; If 2 kg to 10 kg (static or repeated) + 2; If more than 10kg load or repeated or shocks + 3
During the interview and observation process it was established the weight handled was below 1kg

Force/Load Score = 0
Step 8: Find Row in Table C
Add values from step 5,6 & 7 to obtain Wrist Arm score in Table C
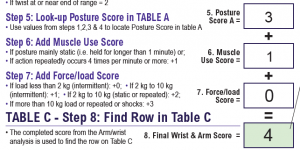
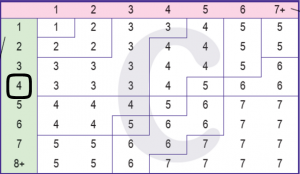
TABLE C Score = 4
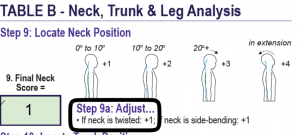
Step 9: Locate Neck Position
The focus of Step 9 is to locate the neck position.
The following options as seen in the image below are provided:
0 to 10 degrees of flexion +1
10 to 20 degrees of flexion + 2
20 + degrees of flexion +3
In extension +4
In the example below the lady was observed to adopt 0 to 10 degrees of flexion.
Step 9a: Adjust…
If neck is twisted + 1
If neck is side bending + 1
In the example below the lady was observed to adopt neck twist.
Neck Position Score = 1
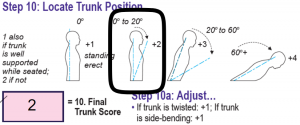
Step 10: Locate Trunk Position
The focus of Step 10 is to locate the trunk position.
The following options as seen in the image below are provided:
0 degrees (standing erect + 0)
0 to 20 degrees + 2
20 to 60 degrees + 3
60 degrees plus + 4
In the example below the lady was observed to adopt 0 to 20 degrees of trunk flexion.
Step 10a: Adjust…
If trunk is twisted + 1
If trunk is side bending + 1
In the example below the lady was not observed twisting or side bending her trunk.
Trunk Position Score = 2
Step 11: Legs
The focus of Step 11 is to establish if the feet are supported and balanced.
If legs & feet supported and balanced + 1
If not + 2
In the example below the lady was observed to adopt a balanced leg and foot posture.
Final Leg Score = 1

Step 12: Look up Posture Score in TABLE B
Use values from steps 9,10, 7 & 11 to locate Posture Score in Table B.
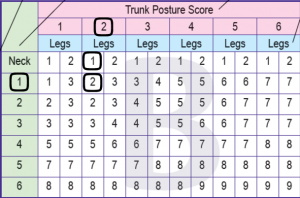
TABLE B Score = 2
Step 13: Add Muscle Use Score
If posture mainly static or;
If action 4/minute or more + 1
During the interview and observation process it was established that a similar action occurs more than 4 times per minute.

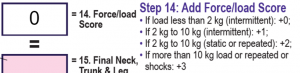
Step 14: Add Force/Load Score
If load less than 2kg (intermittent): + 0; If 2kg to 10kg (intermittent) + 1; If 2 kg to 10 kg (static or repeated) + 2; If more than 10kg load or repeated or shocks + 3
During the interview and observation process it was established the weight handled was below 1kg
Step 15: Find Colums in Table C
Add values from step 12,13 & 14 to obtain Neck and Trunk score in Table C
Table C = 3
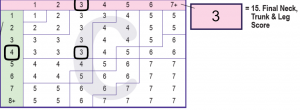
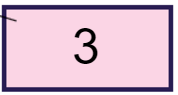
3. Final RULA score
RULA Score = 3 Investigate Further
Ergonomic issues to consider to reduce RULA score:
RULA scored 3 due to the neck twist and trunk flexion.
- Trunk Flexion. The lady was required to reach 680mm to pick up box. BS EN ISO 14738:2008 Safety of Machinery – Anthropometric Requirements for the Design of Workstation at Machinery provides a recommendation of forward reach to be 605mm (5th %ile female forward pinch grip reach). Reducing the forward reach from 680mm to 605mm will help reduce the requirement to adopt a flexed trunk posture and allow for a range of users to work with reduced trunk flexion.
- Neck Twist. During interview it was established that the need to adopt a twisted neck are seldom. The user advised the task requires little neck twist as the box when being assembled is positioned directly in front of operator.
Other Ergonomics issues to consider in this task are but not limited to:
- Height of bench and the working height.
- Lighting levels.
- Frequency of upper limb movement.
- Frequency of breaks as task is repetitive.
- Job rotation.
- Floor surface and footwear to reduce loading within lower limbs and feet.
- Glove design.
If your organisation requires support from a Chartered Ergonomist or for support to complete an ergonomic workplace assessment please contact us.
Download you free RULA Infographic here – Rapid Upper Limb Assessment (RULA) PDF Worksheet